How to perform a Cash Count in CPS Air
The Cash Count process was added to the Advanced drop-down in the Sales screen of CPS Air in version 3.100. You no longer need to end your shift at a PC terminal running CPS v3 when performing the Cash Count. However, if you do a Cash Count on an iPad running CPS Air, your work will also display on a terminal running in CPS v3/POSExpress.
Before you begin a Cash Count, you must be:
-
set up as an employee with a PIN.
-
set up with the permissions to run a Cash Count Note: If there are multiple stores, you must set up the iPad with the correct store.
-
clocked in on the iPad.
To set up the user rule to run cash count
Before you can run Cash Count on the iPad running CPS Air, you must do the following:
-
Go to the Online Options site and log in as an admin or with the proper permissions.
-
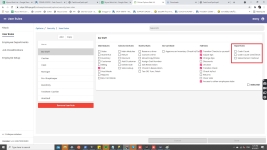
Under the Main hamburger menu, select Options, then Security. The list of security rules display.
-
Select the security rule from the list or click Add to add a new role. The name of that rule displays at the top with all the possible rule checkboxes below.
-
You may need to scroll down to see and select the Cash Count rule under the Report Rules heading to the right. Do one or all of the following based on your needs:
-
Check the Cash Count box to enable the employee to perform a Cash Count (i.e., the Cash Count option will be visible under the Advance menu in the Sales screen of CPS Air).
-
If you check Cash Count Over/Short, the employee will see the over/short amount; left unchecked, you see ***.
-
Check the Sales Person Cashout box to enable the employee to print the Sales Person Cashout report upon clocking out of the iPad, which allows them to see how much currency they should have.
-
Select Save at the bottom and to the right of the screen. The Update Successfully message displays briefly. Now employees/users created with this security rule can use the Cash Count procedure in CPS Air with this security rule.
To run Cash Count on the iPad running CPS Air
Cash Count at the end of your shift
-
Log into the iPad with a PIN. The PIN you use must have the security permissions set to run a Cash Count. (See the “To set up the user rule to run cash count” topic.)
-
Select the the Hamburger menu
 then Sales. The Sales screen displays.
 -
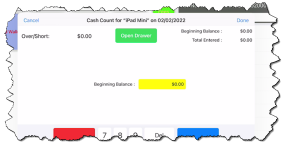
At the top of the Sales screen, select Advanced, then Cash Count. The Cash Count pop-up displays.
-
In the highlighted Beginning Balance field, enter the amount of cash you started with at the beginning of your shift.
-
Select Next. The Cash Count screen displays fields available for each bill-type denomination and highlights the $100 field first.
-
Enter the total number of bills for each field, OR leave at 0, then select Next again.
Note: If you make a mistake, tap on the field that needs to be updated and enter the new number.
-
Continue entering in each field an amount of the number of bills you have until the number displayed at the top-right in the Total Entered field is equal to the Beginning Balance field.
Note: If turned on in the setup, the Over/Short field displays in the top-left corner; it changes on each of your entries, letting you know if you are over or short.
-
(Optional) When finished, if the drawer was previously set up and your facility operates this way, select the Open Drawer button to open the till.
-
Select Done in the top-right corner of this pop-up screen. You can now print the cash report if you are permitted to do so and clock out if need be.
Note: You can print your Cash Out report in the two following ways: 1. Use the Cash Out Report button from the Hamburger menu under your [employee name] button. To see how, click here>> or 2. Clock out and respond to the prompt asking, “Would you like to print out your Cash Out Report?”
Note: The Cash Count - Cash Out Report will be done in real-time, and it should not matter when you end your shift. The report in the Reports module can be set with the start/end time of reports, so you don't have to change the filter every time you run the report.

